

Appearance
OpenID Connect
Please follow the steps below to configure your account. We currently only allow one source of authentication per account; so by configuring an OpenID Connect provider, you must authenticate through only them. If we don't have a guide for your provider below, please contact us so we can help guide you through the process.
Google GSuite
Prerequisites
- Access to a Google Developer account
- Access to the Enclave Management Console with a user that has the
users.adminpolicy attached
Setup
- Follow Google's instructions create a new OAuth 2.0 app. Go to the Credentials page and create a new OAuth 2.0 client ID. Keep this information available for the next step.
- Navigate to the Enclave Management Console and go to the SSO page under your Settings.
- Select OpenID Connect and copy your client ID and client secret into their relevant fields.
- Next add in the email scope as an authorized scope. Click save.
- A redirect URL will appear below the form, copy this URL and add it to the Authorized redirect URIs under the credentials you generated for the app.
- Test it out by logging into an user agent.
Microsoft O365
Prerequisites
- Access to a Microsoft Azure account
- Access to the Enclave Management Console with a user that has the
users.adminpolicy attached
Setup
- Navigate to App Registrations in the Azure portal and click New Registration.
- Follow the instructions to create a new application. You will need to allow ID Tokens to allow the OpenID Connect provider to authenticate with the necessary data.
- Once the application is created, under Client secrets click + New client secret. Keep this secret available for use back on Enclave.
- Navigate to the Enclave Management Console and go to the SSO page under your Settings.
- Select OpenID Connect and copy your client ID and client secret into their relevant fields. Click Save. Your client ID will be the Application (client) ID available on the Overview page of your application in the Azure Portal.
- Next add in the email scope as an authorized scope. Click save.
- A redirect URL will appear below the form, copy this URL and add it to the Redirect URI under the application on the Azure portal.
- Test it out by logging into an user agent.
Jumpcloud
Prerequisites
- Access to a Jumpcloud admin account
- Access to the Enclave Management Console with a user that has the
users.adminpolicy attached
Setup
- Navigate to SSO Applications in the Jumpcloud portal and click + Add New Application.
- Select Custom Application then check Manage Single Sign-On (SSO) then check Configure SOO with OIDC and hit next.
- Set the Display Label to Enclave and the logo/colors to what you would like. Your application will now be created and you will be brought to the SSO screen.
- Navigate to the Enclave Management Console and go to the SSO page under your Settings.
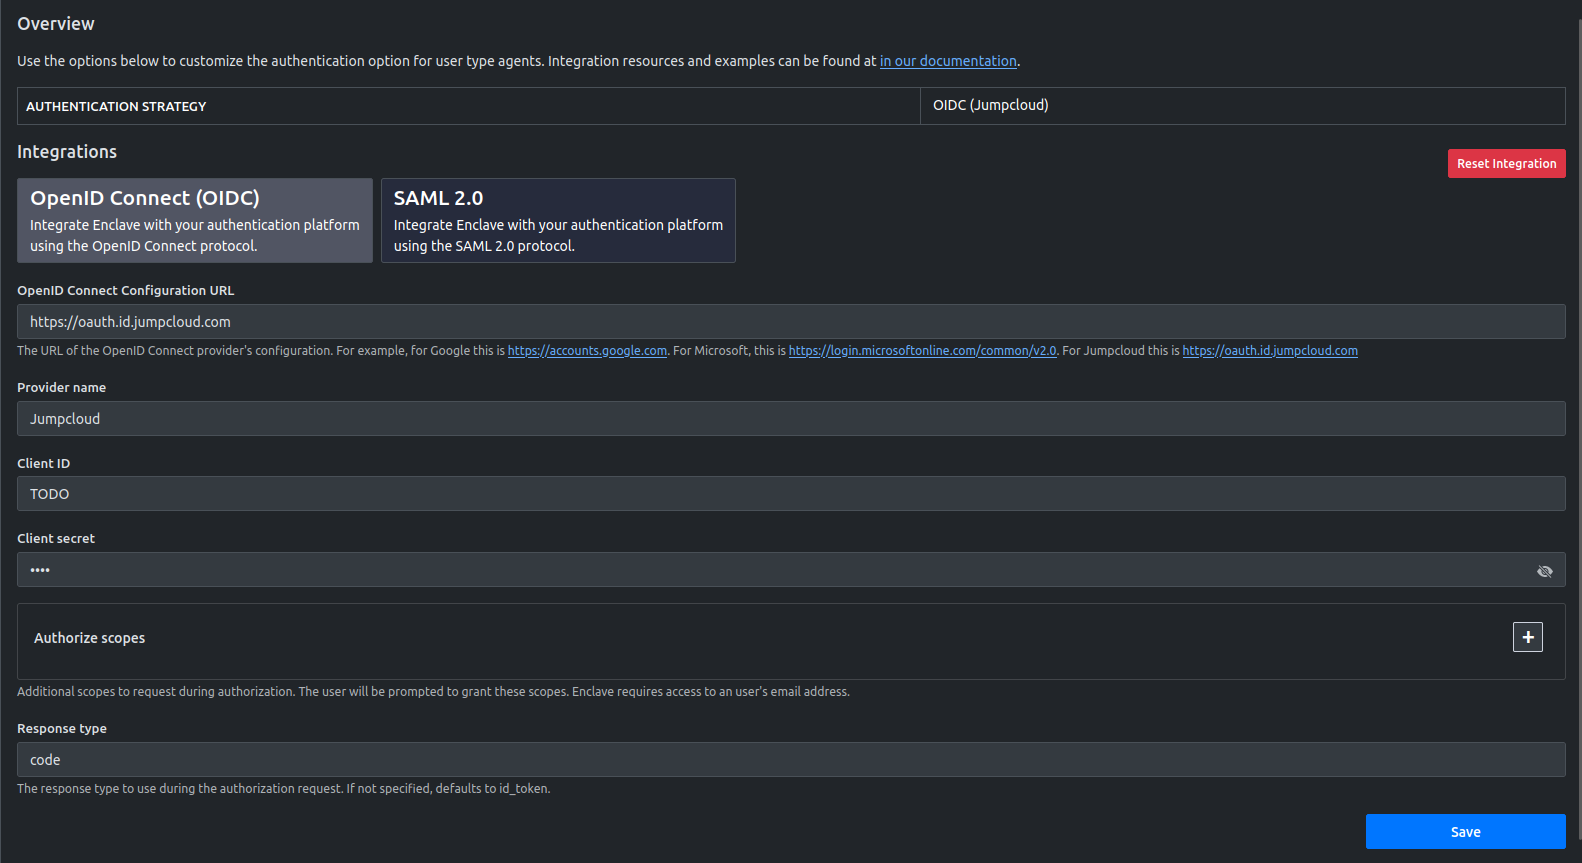
- Select OpenID Connect (OIDC) and fill out the form entering a random value like TODO in both the Client ID and Client secret. Jumpcloud does not provide those values until you give them a valid Redirect URL. You will also need to set the Response type to code. An example form is shown below:
- Copy the Redirct URL that is generated below the form after submission and head back to the Jumpcloud portal.
- Fill out the form using the values below. Any value not listened below you can leave to the default set in the form. Make sure to use the generated Redirect URL in the Redirect URIs value in Jumpcloud:
- Redirect URIs: Value generated in the Enclave Management Console
- Client authentication type: Client secret basic
- Login URL: https://enclave.sidechannel.com
- Standard Scopes: ✓ Email
- Hit activate and Jumpcloud will generate you a Client ID and Client secret. Copy those values back to the SSO form in the Enclave Management Console and save them.
- Test it out by logging into an user agent.
Okta
Prerequisites
- Access to an Okta account
- Access to the Enclave Management Console with a user that has the
users.adminpolicy attached
Setup
- Navigate to Applications in the Okta portal and click Create App Integration.
- Select OIDC - OpenID Connect then check Web Application. Click Next.
- Navigate to the Enclave Management Console and go to the SSO page under your Settings.
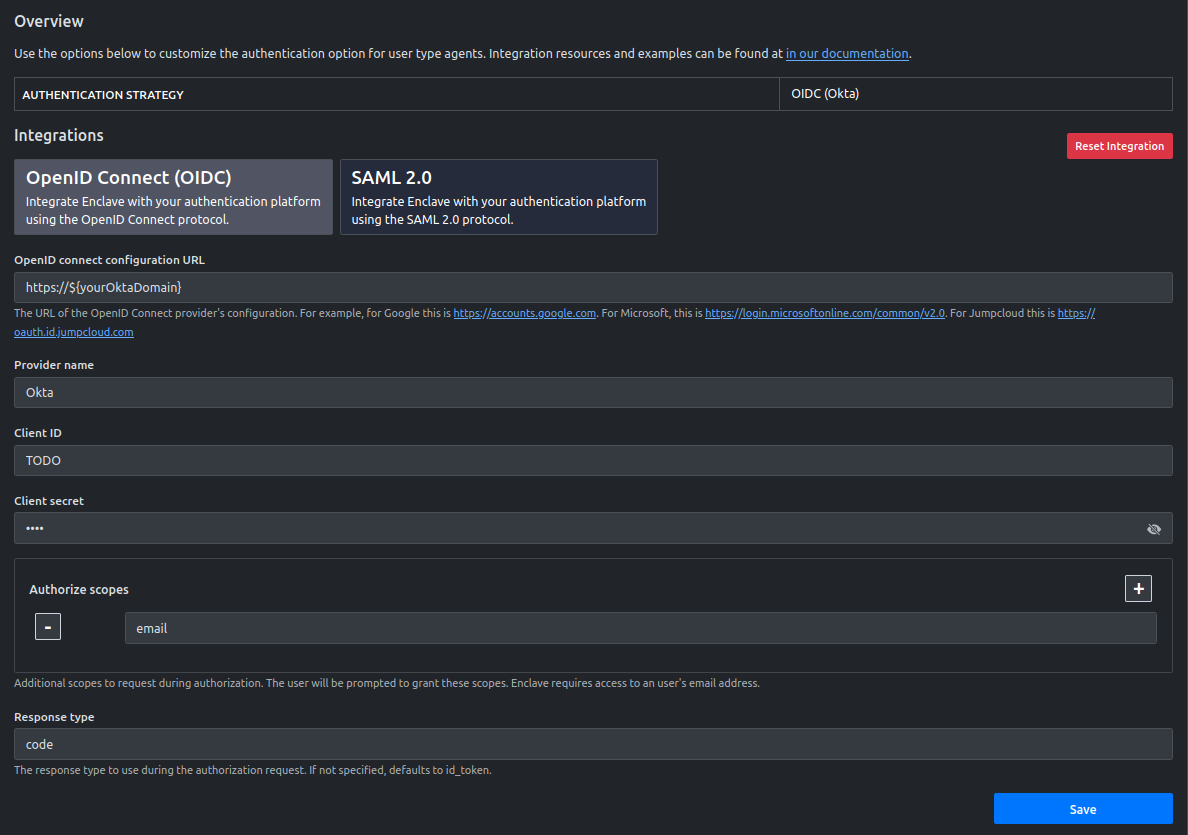
- Select OpenID Connect (OIDC) with the values referenced in the image below. You will be entering a random value like TODO in both the Client ID and Client secret. Okta does not provide those values until you give them a valid Redirect URL. You will also need to set the Response type to code as well as add the email to the Authorize scopes. Please reference the image below:
- Copy the Redirct URL that is generated below the form after submission and head back to the Okta portal.
- Fill out the form using the values below. Any value not listened below you can leave to the default set in the form. Make sure to use the generated Redirect URL in the Sign-in redirect URIs value in Okta:
- Sign-in redirect URIs: Value generated in the Enclave Management Console
- Hit save and Okta will generate you a Client ID and Client secret. Copy those values back to the SSO form in the Enclave Management Console and save them.
- Test it out by logging into an user agent.